Home
Hole Repair
Hanging Tips
Sanding Drywall
Mudding Tips
Contact Us
Our Products
  

Learn To Finish Drywall From a Pro!


You won’t find this information anywhere else!


Your Program Includes:


A 226-page eBook packed full of drywall trade secrets: "The Trade Secrets to EASIER Taping, Finishing and Texturing"


PLUS


Bonus Guide #1: "Sagging Ceilings - Can You Avoid the Tear-Out?"


Bonus Guide #2: "The Mud Swirl." A short 6-page how-to guide for this popular type of texture.


Bonus #3: Unlimited FREE Access to 17 On-The-Job Training Videos!


More Info

Sheetrock and Repair Tips for Sanding Drywall

The following sheetrock and repair tips include a dependable step-by-step routine for sanding any drywall project, along with a link to some important painting tips and other information that you won't find anywhere else!

The fact is it's EASY to sand drywall when you follow the step-by-step instructions for taping and coating in the Trade Secrets Course. You’re in for a SHORT day of sanding - and a day of painting that’s guaranteed to put a grin on your face! I’ve used the following simple step-by-step routine to sand drywall for decades, because my reputation depended on it!

Even if you decide to use the sanding machines that are available, you’ll still need this step-by-step routine for correcting every flaw - BEFORE you start painting.

First of all, there’s no need to sand drywall two different times – with two different types of sandpaper, although some authors recommend this approach.
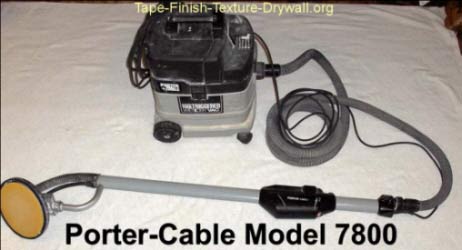
Sheetrock and Repair Tips #1: If you haven’t tried a sanding machine like the one shown below, I highly recommend it! The “Porter Cable” rotary drywall sander is available for rent at most tool rental shops, and it’s a dream come true!

This machine does all the work – and sucks up the dust at the same time! What more could you ask for? The only thing that it doesn’t do are the tight little intricate areas (like inside corners) – which are done by hand with a sanding sponge.

Another dust-free alternative:

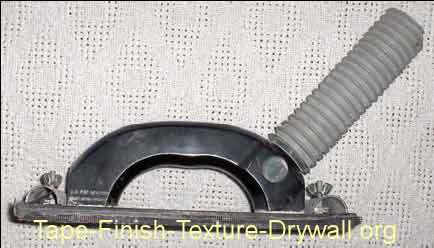
Sheetrock and Repair Tips# 2: The hand-sander shown above hooks up to a vac and requires the use of sanding “screen”. You can also find sanding “poles” that are designed the same way. With a decent shop vac, you won’t create any dust!


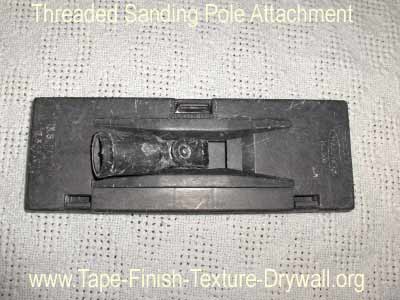
Sheetrock and Repair Tips #3: Remember, few parts of a drywall job are actually “flat”. Many beginners will attempt to “sand” everything “flat” by sanding their recessed joints all the way down to the level of the factory recess. Read Chapter 9 of the Trade Secrets Course if you don’t already understand “why” this is a waste of time.

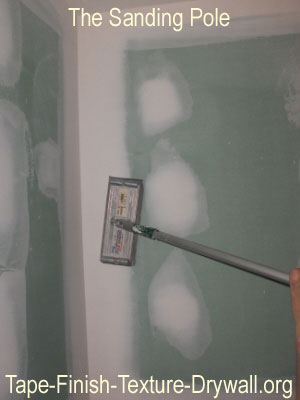
You will need the following:

  • A flashlight -or- A hand-held work light with an exposed 40-watt bulb.

  • Pre-cut drywall sanding sheets (120-150 grit). Any grit rating “under” 120 is more likely to “scuff” the drywall face-paper. For the vacuum-type hand-sanders: 220-grit pre-cut sanding “screen” is required.

  • A sanding pole

  • A respirator (Be sure it’s a SANDING respirator)

  • A “wedge-shaped” sanding sponge.

  • A #2 pencil (no markers, crayons, or ink)

LOOK, BEFORE you sand!

Sheetrock and Repair Tips #4: Turn off any bright lighting in the work area - before you begin sanding. If you're using a hand-held light, just hold the bulb against the drywall and glide it along the walls. If you’re using the flashlight, just “skip” the light “across” the surface that you’re inspecting. You’ll be “amazed” at how well you can see the defects when you look – BEFORE YOU SAND. The defects will literally “jump-out” at you.

WHAT TO LOOK FOR:

If you applied the “final coat” correctly, you’ll notice that most everything is already edge-free and “smooth”.

Usually, the only defects that are left behind after a good final-coat are a few specific areas with “deep” bubble holes that might need “another” final coat and often times a few dimples in the inside corners from fastener heads.

Lightly mark these areas with a pencil when you find them. Touch-up these areas with some ready mix BEFORE YOU START SANDING. Allow a half hour or so for drying.

Now you're ready for Stage 1: Pole Sanding.


Related Articles:

Sheetrock and Repair Tips - Sanding Stage-1
Sheetrock and repair tips covering Stage 1 of the step-by-step sanding routine that I've used for decades. You'll never miss even 1 flaw . Zero touch-ups after painting!

Sheetrock and Repair - Sanding - Stage 2
Sheetrock and repair tips for eliminating 100% of the "after-painting" touch-ups! Links to IMPORTANT tips for all phases of the job. Painting over sheetrock included!

Tips on Installing Drywall - Definitions
The following definitions and tips on installing drywall will help to speed your learning.

Tips for Painting Over Sheetrock
Making the right choices when painting over sheetrock leads to goof-proof results and a day of painting that's guaranteed to put a grin on your face (even if you hate painting!)


Page copy protected against web site content infringement by Copyscape

© Jeff Croft